In part two exploring Azure Front door we'll take a look at routing rules and load balancing services in our backend pool. This article is based upon the application and resources we created in part one.
Lets do a quick recap and list out the resources we created in part 1. Running az resource list --resource-group frontdoor-example-rg -o table lists out all the resources we've created in our resource group
| Name | ResourceGroup | Location | Type | |
|---|---|---|---|---|
| frontdoor-example | frontdoor-example-rg | global | Microsoft.Network/frontdoors | |
| frontdoor-example-appserviceplan | frontdoor-example-rg | westeurope | Microsoft.Web/serverFarms | |
| frontdoorwebapp01 | frontdoor-example-rg | westeurope | Microsoft.Web/sites | |
| frontdoorwebapp02 | frontdoor-example-rg | westeurope | Microsoft.Web/sites |
In the resource group we find four services: Azure Front Door, an appservice plan and two web apps hosting our .NET 5 application. Have you noticed Azure Front Door´s location? Its global and this isn't something we have to specify when we create the resource. This is really the core of Azure Front Door, to redirect your requests to the closest available service in terms of latency.
Azure Front Door has a concept of Backends, Backend Pools and Health Probes. A backend can be an Azure hosted web service, On-Prem service or even a non Azure service such as a web service running on Amazon EC2 that receives similar traffic.
A backend pool is a collection of backends. A backend pool controls how to load balance traffic based weight, priority and availablity. Availability are evaluated by configured Health Probes probing endpoints in each backend.
A health probe determines whether a backend is available or not by periodically sending probe requests over HTTP(S) to a specific endpoint in the backend. An example could be an API hosting a /health endpoint returning HTTP 200 if all dependent services are up and running as expected. If other status codes are returned, the service is considered unhealth and traffic will not be sent to this backend instance.
Let's list all health probes in our Azure Front Door service by running the following command on Azure CLI:
az network front-door probe list --front-door-name frontdoor-example --resource-group frontdoor-example-rg
[
  {
    "enabledState": "Enabled",
    "healthProbeMethod": "Head",
    "id": "/subscriptions/<subscription-guid>/resourcegroups/frontdoor-example-rg/providers/Microsoft.Network/Frontdoors/frontdoor-example/HealthProbeSettings/DefaultProbeSettings",
    "intervalInSeconds": 30,
    "name": "DefaultProbeSettings",
    "path": "/",
    "protocol": "Https",
    "resourceGroup": "frontdoor-example-rg",
    "resourceState": "Enabled",
    "type": "Microsoft.Network/Frontdoors/HealthProbeSettings"
  }
]
We can see that this health probe targets the root-path for our backends and that the health probe is the default one created when we created the Azure Front Door service. The default health probe will probe our backends every 30 seconds to determine health of the backend.
We can also see our load balancer by running the following command on Azure CLI
az network front-door load-balancing list --front-door-name frontdoor-example --resource-group frontdoor-example-rg
[
  {
    "additionalLatencyMilliseconds": 0,
    "id": "/subscriptions/<subscription-id>/resourcegroups/frontdoor-example-rg/providers/Microsoft.Network/Frontdoors/frontdoor-example/LoadBalancingSettings/DefaultLoadBalancingSettings",
    "name": "DefaultLoadBalancingSettings",
    "resourceGroup": "frontdoor-example-rg",
    "resourceState": "Enabled",
    "sampleSize": 4,
    "successfulSamplesRequired": 2,
    "type": "Microsoft.Network/Frontdoors/LoadBalancingSettings"
  }
]
There are a couple of things that we need to pay attention to here. AdditionalLatencyMilliseconds defines if requests will be sent to the fastest backend in terms of latency or if Azure Front Door should use Round Robin to schedule traffic between the fastest and the second fastests backend. In this particular case, with the value set to 0, traffic will always be routed to the fastes backend. SampleSize defines how many samples the health probe needs to send before we can evalute the health of a backend in a backend pool. SuccessfulSamplesRequired defines how many of the sampleSize that need to result in a HTTP 200 from the health probe to consider it health. An example:
Our health probe probes our backends health-endpoint every 15 seconds, our SampleSize is set to 4 and SucessfulSamplesRequired is set to 2. To mark our backend as healthy, at least 2 out of the 4 samples performed every 60 seconds(15 x 4) has to return HTTP 200.
Routing and load balancing requests
Lets take a look at the different routing and load balancing mechanisms that Azure Front Door has to offer.
Weighted and prioritized routing
Within a backend pool we can load balance requests based on priority and/or a specified weight. Priority can be a value between 1 and 5. A lower value means higher priority. This is also refered to as Active/Passive deployment. In case a backend in the backend pool with the highest priority is marked as unhealth by the Health Probe, traffic will be routed to the backend with the seconds highest configured priority.
Weighted routing on the other hand is a concept of distributing traffic based on a value between 0 and 1000 with a Round Robin scheduling mechanism. The higher the weight is, the more traffic will be routed to the backend.
But what happends if multiple backends in a backend pool have configured the same priority, but different weight?
As long as our health probe has marked all backends as healthy and available in terms of meeting the accepted latency, requests will distributed with round robin based on the weight. To demonstrate this, let's list out our default backend pool and the configuration for each backend:
az network front-door backend-pool backend list \
--pool-name DefaultBackendPool \
--front-door-name frontdoor-example \
--resource-group frontdoor-example-rg \
--output table
Running this command from Azure CLI will list the following:
| Address | BackendHostHeader | EnabledState | HttpPort | HttpsPort | Priority | Weight |
|---|---|---|---|---|---|---|
| frontdoorwebapp01.azurewebsites.net | frontdoorwebapp01.azurewebsites.net | Enabled | 80 | 443 | 1 | 100 |
| frontdoorwebapp02.azurewebsites.net | frontdoorwebapp02.azurewebsites.net | Enabled | 80 | 443 | 1 | 1000 |
As you can see, both of the backends share the same priority, but differs in weight. For this particular configuration approx. 1/10th of the traffic will be distributed to frontdoorwebapp01.azurewebsites.net and the rest to frontdoorwebapp02.azurewebsites.net. Running for instance cURL 20 times on our Azure Front Door url will hit frontdoorwebapp01 approx. two times.
Routing based on content in the HTTP request
Another feature of Azure Front Door is to route traffic to different backend pools based on the http request. Both of our backends are located in the same backend pool, so lets create a new backend pool and move one of the backends to this backend pool.
Create a new backend pool
az network front-door backend-pool create \
--address frontdoorwebapp02.azurewebsites.net \
--front-door-name frontdoor-example \
--load-balancing DefaultLoadBalancingSettings \
--name second-backend-pool \
--probe DefaultProbeSettings \
--resource-group frontdoor-example-rg
In this particular example we are re-using the load balancer and health probe from the default backend pool. You might want to create separate load balancers and probe settings per backend pool. We've also added the FQDN for our web app to this backend pool. Lets remove this one from the other default backend pool
OBS: the parameter --index starts at 1, not 0.
az network front-door backend-pool backend remove \
--front-door-name frontdoor-example \
--resource-group frontdoor-example-rg \
--pool-name DefaultBackendPool \
--index 1
Until now we have create a new backend pool and moved frontdoorwebapp02to this new backend pool. Lets start by creating a new Rule from the Rules Engine Configuration
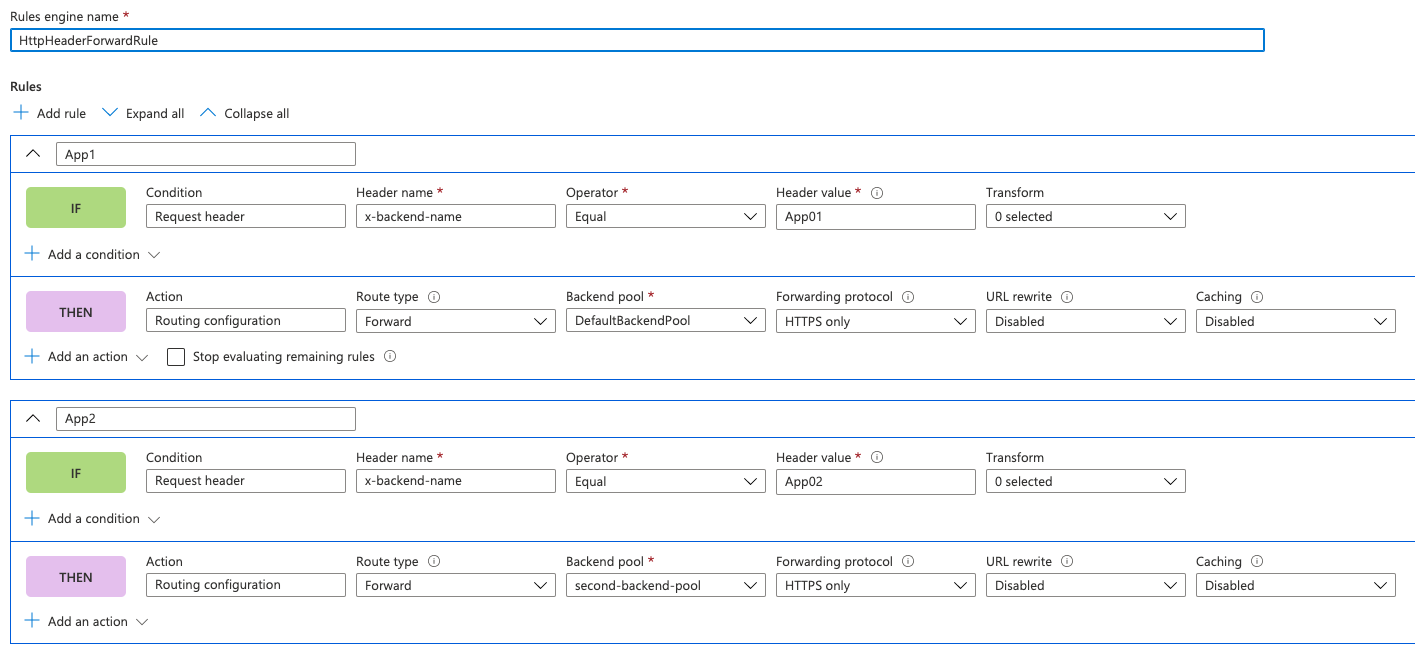
These two rules are pretty straight forward. If the request has a http header with key x-backend-name equal App01, the request will be forwarded to backend pool DefaultBackendPool. If the header equals to App02 the request will be redirected to the backendpool with name second-backend-pool.
As a last thing we'll need to associate this rule with a routing rule and then assign the routing rule to a backend pool. Lets do that now:
az network front-door routing-rule create \
--front-door-name frontdoor-example \
--name forwardRequestRoutingRule \
--resource-group frontdoor-example-rg \
--route-type Forward \
--backend-pool second-backend-pool \
--rules-engine HttpHeaderForwardRule \
--frontend-endpoints DefaultFrontendEndpoint
Lets try it out!
curl -s -H "x-backend-name: App02" -s https://frontdoor-example.azurefd.net
> Greetings from 'Web App 02'
curl -s -H "x-backend-name: App01" -s https://frontdoor-example.azurefd.net
> Greetings from 'Web App 01'
Wrapping up
In this article series we've discovered how to load balance and to create routing rules with Azure Front Door. We've looked at how to override routing to different backend pools by create a custom rule that inspects the HTTP header and forwards the request.
Thanks for reading!