Azure Front Door is a global and scalable entry point that sits between your application and the internet. The service uses edge networks to route traffic to your fastest and and most available backend service. In this article series, in two parts, we'll discover the capabilities and possibilities by using Azure Front Door as a load balancer and routing service in front of two Azure Web Apps hosting a simple application running .NET 5.
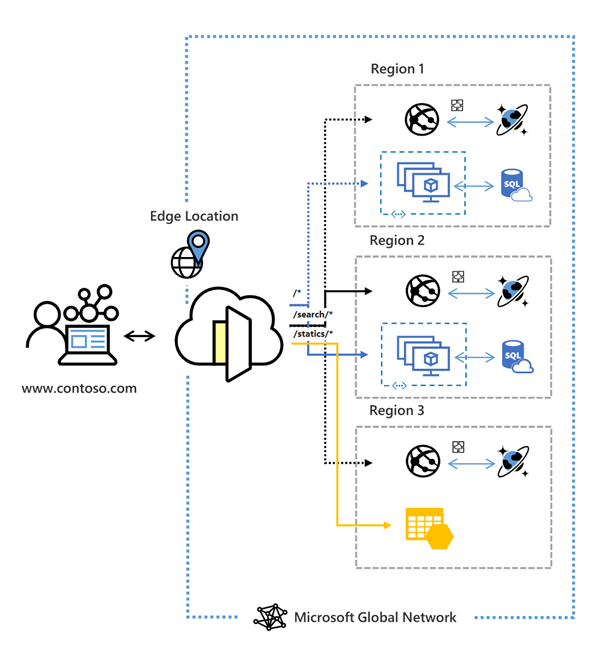
Azure Front door is one of four load balancing solutions available in Azure. However, only two of the solutions are meant to load balance HTTP requests, Azure Front Door and Application Gateway. One of the most important differences between Azure Application Gateway and Azure Front Door is that the latter is globally scaled by default and can very quickly failover to a secondary resource in case of a regional outage. Application Gateway on the other hand needs to be deployed in different regions within your subscription meaning that it operates regionally. Another significant difference is that network traffic passes through Azure Front Door and therefore you can capture and create routing rules based properties within the HTTP request such as the HTTP Headers, request protocol, request body etc.
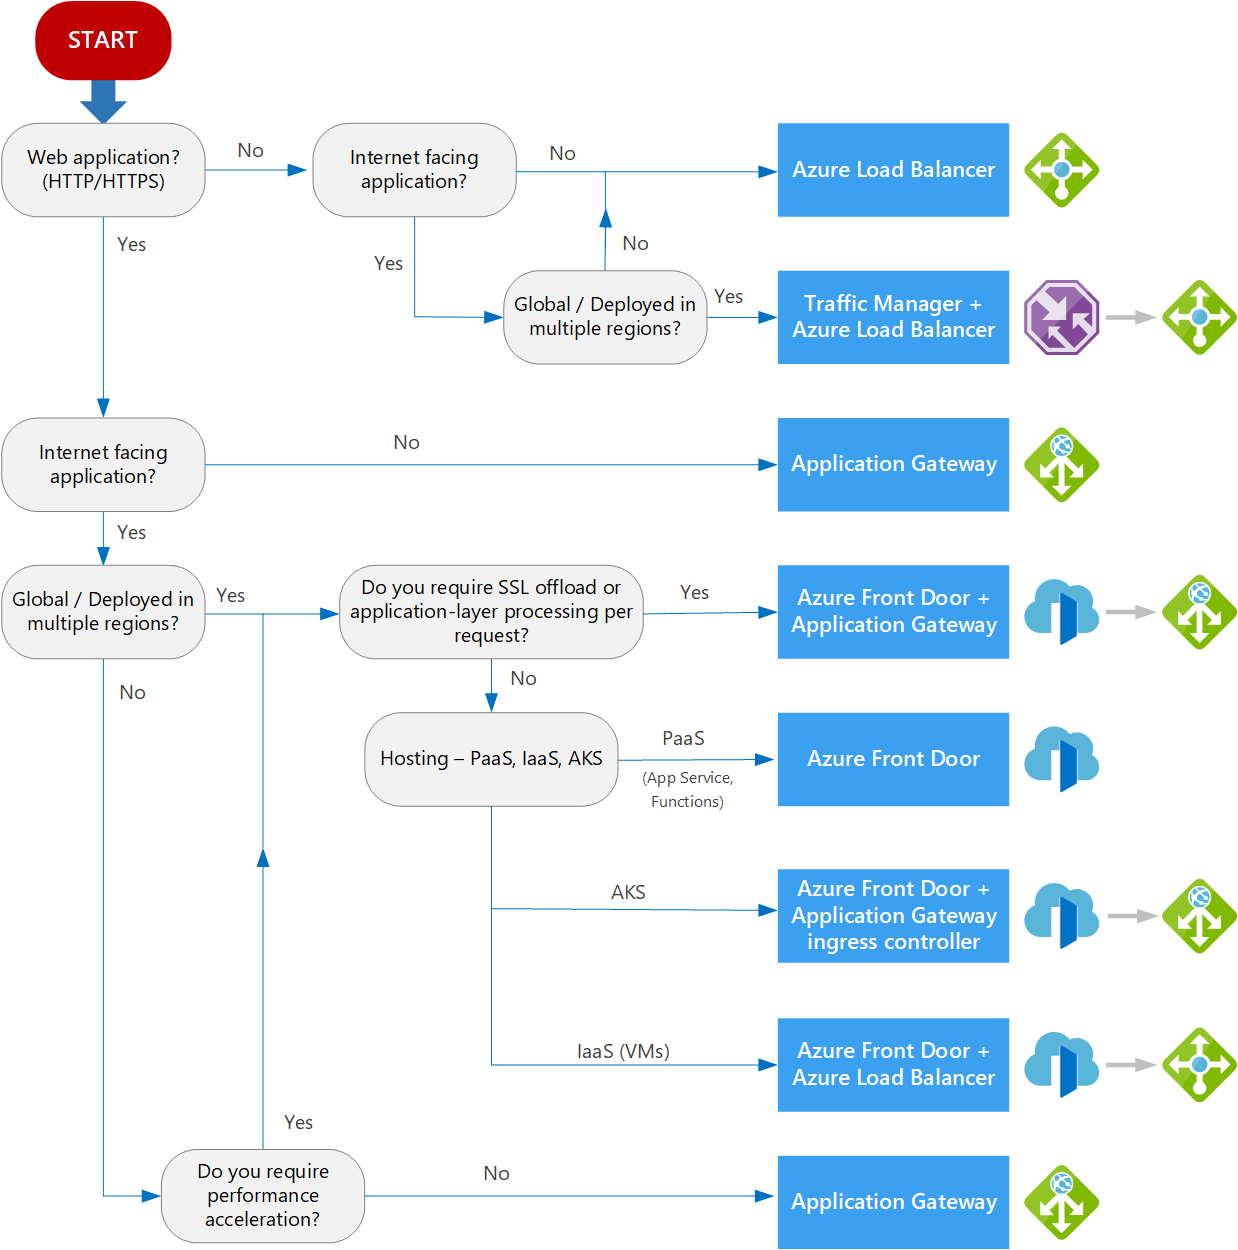
If you are on the verge of choosing one of the four Load balancing solutions Microsoft Azure has to offer, but can't really decide which suits your use case the best, I really recommend this flow chart from Microsoft:
Show me the code!
To demonstrate Azure Front Door, we will create a simple .NET 5 application, deploy two web app instances running the app, create and configure our Azure Front Door service to point to the Web Apps. Our application reads an environment variable and returns it in case of a HTTP GET request
public class Startup
{
    public void Configure(IApplicationBuilder app, IWebHostEnvironment env)
    {
        app.Use(async (ctx, next) =>
        {
            if(ctx.Request.Method.ToLower() == "get")
            {
                var appName = Environment.GetEnvironmentVariable("AppName");
                await ctx.Response.WriteAsync($"Greetings from '{appName}'");
            }
        });
    }
}
The application gets deployed to Azure whenever a push is done to main. The workflow file is based on my article about GitHub Actions and looks like this:
name: "Build app and deploy to Azure"
on: [push]

jobs:
  build:
    name: 'Build and Deploy a ASP.NET 5 App to Azure App Service'
    runs-on: 'ubuntu-latest'
    steps:
      - name: 'Checkout Code from Repository'
        uses: actions/checkout@v2
      - name: 'Set up .NET 5.0.x'
        uses: actions/setup-dotnet@v1
        with:
          dotnet-version: '5.0.x'
      - name: 'Publish a Release of the App'
        run: |
          cd src/
          dotnet publish -c Release --output '../published-app'
      - name: 'Deploy to Azure App Service: Frontdoor-web-app'
        uses: azure/webapps-deploy@v2
        with:
          app-name: 'frontdoorwebapp01'
          publish-profile: ${{ secrets.PUBLISH_PROFILE_APP1 }}
          package: ./published-app
      - name: 'Deploy to Azure App Service: Frontdoor-secondary-web-app'
        uses: azure/webapps-deploy@v2
        with:
          app-name: 'frontdoorwebapp02'
          publish-profile: ${{ secrets.PUBLISH_PROFILE_APP2 }}
          package: ./published-app
Before we can run the workflow, we'll need to create the resources in Azure. Lets do that now.
Create resources in Azure
We'll first start by signing into the Azure Portal by running the following command in Azure CLI az login. Resources in Azure lives in Resource Groups. Lets create one:
az group create --name 'frontdoor-example-rg'
In our resource group we'll create four resources. An App Service Plan, two Azure Web Apps and Azure Front Door. Lets start by creating the App Service Plan
az appservice plan create \
--name 'frontdoor-example-appserviceplan' \
--resource-group 'frontdoor-example-rg' \
--sku FREE
Then we'll two web apps in our App Service Plan.
az webapp create \
--name 'frontdoorwebapp01' \
--resource-group 'Frontdoor-example-rg' \
--plan 'frontdoor-example-appserviceplan'
az webapp create \
--name 'frontdoorwebapp02' \
--resource-group 'Frontdoor-example-rg' \
--plan 'frontdoor-example-appserviceplan'
Lets wait until the deployment have completed and then update the environment variables for both apps:
az webapp config appsettings set \
-g Frontdoor-example-rg \
-n frontdoorwebapp01 \
--settings AppName="Web App 01"

az webapp config appsettings set \
-g Frontdoor-example-rg \
-n frontdoorwebapp02 \
--settings AppName="Web App 02"
Lets test our apps by running a cURL operation against both endpoints.
curl -s https://frontdoorwebapp01.azurewebsites.net
> Greetings from 'Web App 01'

curl -s https://frontdoorwebapp02.azurewebsites.net
> Greetings from 'Web App 02'
Perfect! Lets create and configure Azure Front Door!
Create and configure Azure Front Door
Again we are working from our terminal and Azure CLI. Until now we have created a resource group with an app service plan with two web apps. Lets create and configure Azure Front Door which will act as a Load Balancer between internet and our web apps. Before we start you probably need to add the front-door extension to your Azure CLI. az extension add --name front-door.
We're ready to create an Azure Front Door resource:
az network front-door create \
--resource-group frontdoor-example-rg \
--name frontdoor-example \
--accepted-protocols "Http" "Https" \
--backend-address frontdoorwebapp01.azurewebsites.net
Azure Front Door uses the term backend pool which consists of several backend-addresses that points to other services, in our case two Azure Web Apps. Deployment of Azure Front Door can take several minutes to complete. Once the service has been created we can browse it from http(s)://<front-door-name>.azurefd.net
Lets try to perform a cURL operation against the Front Door Service.
curl -s https://frontdoor-example.azurefd.net/
> Greetings from 'Web App 01'
As we only have added WebApp01 to the backend-pool, we'll never get routed to WebApp02. Lets do something about it!
az network front-door backend-pool backend add \
--address frontdoorwebapp02.azurewebsites.net \
--front-door-name "frontdoor-example" \
--pool-name "DefaultBackendPool" \
--resource-group "frontdoor-example-rg"
Now we've added both of our apps to the backend pool. Lets try to stop WebApp01 and see what happens:
az webapp stop --name frontdoorwebapp01 \
--resource-group Frontdoor-example-rg
Perform another cURL operation against our Front Door:
curl -s https://frontdoor-example.azurefd.net/
> Greetings from 'Web App 02'
As we can see Front Door redirected to our secondary app, as we stopped WebApp01. This is also visible from the portal:
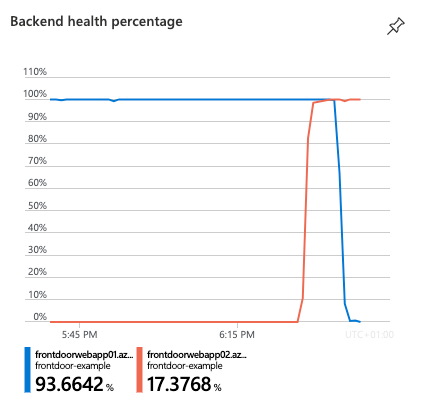
Thats it. In this article we've demonstrated a really simple way to load balance and automatically failover to a secondary application. In the next article we'll take a look at how to configure routing rules and create custom routing rules in Azure Front Door.
Thanks for reading!