Introduction
Nine months back I wrote a post on how you can run seq in Azure. Back then we used Azure Container Instances as our hosting platform. A few months back we migrated most of our workloads to Azure Kubernetes Services and it didn't make any sense to continue running Seq on Container Instances when we had a Kubernetes Cluster. So we figured out that we could easily install Seq as a Helm Chart and customize the deployment to fit our needs.
We were quickly up and running with an instance of Seq in our cluster, but one issue remained to be solved: How can we store data such as api keys, configuration and the actual log data outside the cluster so we easily can redeploy the cluster without having to worry about losing configuration and rotating api keys for all of our applications?
Configure a Storage Class, PVC and PV.
In the configuration file for the helm chart, values.yaml, a section named persistence let's us configure persistence (doh) by using something call a PVC, short for Persistent Volume Claim.
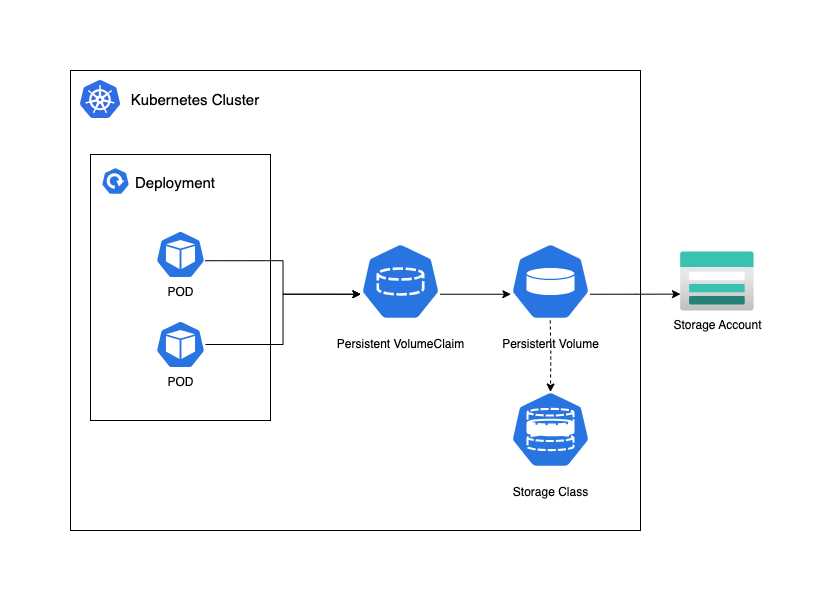
A PVC works in conjuction with a PV, short for Persistent Volume. A PVC allows Pods in your cluster to access a PV. A PV is assigned to a Storage Class which essentially abstracts away various storage solutions such as Azure Storage Account. The illustration below sums up how everything is connected
For this to work you'll need an Azure Storage Account with at least Premium_LRS set as the SKU. If you need zone redundancy, you can choose for Premium_ZRS. The storage account needs to be of kind FileStorage and have a File Share Configured. Please see this post for Bicep templates. Please make sure that the Managed Identity configured as Kubelet Identity has access to this Storage Account.
Lets start by defining our StorageClass.yaml:
kind: StorageClass
apiVersion: storage.k8s.io/v1
metadata:
  name: seq-azurefile
provisioner: file.csi.azure.com
allowVolumeExpansion: true
mountOptions:
 - dir_mode=0777
 - file_mode=0777
parameters:
  skuName: Premium_LRS
  storageAccount: <storage-account-name>
  location: <storage-account-geographic-location>
Then we'll create our PersistentVolume.yaml
apiVersion: v1
kind: PersistentVolume
metadata:
  annotations:
    pv.kubernetes.io/provisioned-by: file.csi.azure.com
  name: seq-azurefile
spec:
  capacity:
    storage: 100Gi
  accessModes:
    - ReadWriteMany
  persistentVolumeReclaimPolicy: Retain
  storageClassName: seq-azurefile
  csi:
    driver: file.csi.azure.com
    readOnly: false
    volumeHandle: replace_with_unique_id_across_cluster
    volumeAttributes:
      resourceGroup: replace_with_storage_account_rg
      shareName: replace_with_file_share_name
      storageAccount: replace_with_storage_account_name
  mountOptions:
    - dir_mode=0777
    - file_mode=0777
    - uid=0
    - gid=0
    - mfsymlinks
    - cache=strict
    - nosharesock
    - nobrl
And finally lets create our PersistentVolumeClaim.yaml
apiVersion: v1
kind: PersistentVolumeClaim
metadata:
  name: seq-azurefile-pvc
  namespace: your-aks-namespace
spec:
  accessModes:
    - ReadWriteMany
  storageClassName: seq-azurefile
  volumeName: seq-azurefile
  resources:
    requests:
      storage: 100Gi
Apply these changes to the cluster by running kubectl apply -f <file-name> or for all yaml-files in the current folder kubectl apply -f.
To verify that everything works as expected you can either run a series of kubectl commands, or by navigating to your cluster in the Azure Portal and select the tab 'Storage'. You should see your PVC and PV with the status Bound. In case you prefer to verify this via your terminal you can run the following commands:
kubectl get pvc --all-namespaceskubectl get pv --all-namespaceskubectl get sc --all-namespaces
Configure values.yaml for Seq
In Seq values.yaml we'll need to reference our existing PVC
persistence:
  enabled: true
  existingClaim: seq-azurefile-pvc
  reclaimPolicy: Retain
  volumeBindingMode: Immediate
  allowVolumeExpansion: true
Finnaly we can now install Seq as a Helm Chart with the provided configuration:
helm upgrade --install -f values.yaml --namespace logs seq datalust/seq
Verify that everthing works by describing the pod in your cluster and look for events in case something is wrong:
kubectl get pods -n logs and look for Seq. Copy the name of the Pod and run kubectl describe pod <pod-name> -n logs
Thanks for reading, and if you have any questions, you can find me on X with the handle @thorstensen